
Easiest way to create integration tests for GraphQL server with 80% code coverage in 30 minutes.


Intro
Integration testing is an essential part of any robust software development process, yet creating effective tests can be a daunting and time-consuming task for developers.
For those using GraphQL servers, the challenge is even more pronounced, as writing comprehensive tests requires understanding complex queries, mutations, and schemas.
In this blog post, we'll go through the easiest way to get started with automated tests for GraphQL server by using Pythagora - an open source tool that creates automated integration tests by analyzing server activity without you having to write a single line of code. We will explore how to get even 80% code coverage in just 30 minutes of playing around the server.

Installation and setup
Getting started with Pythagora is a breeze, as it's designed to be a user-friendly tool for developers of all experience levels. To install Pythagora, simply run the following command in your project directory:
npm install pythagora
Once installed, there are two essential commands you need to know. The first one is to start capturing server activity and tests and the second one is to run the created tests.
Creating tests
Pythgora works by capturing API requests which it uses to determine the start and the end of an integration test. So, to get Pythagora to create tests, you need to start your app wrapped in Pythagora by running the following command:
npx pythagora --init-command "my start command" --mode capture
The "my start command" is the command you're using to run your app. For example:
npm run startnest start(if you're using a framework like NestJS)node index.js
When you execute the capture command, Pythagora will start your GraphQL server and monitor its activity. Now, you just need to make API requests to your server. To do this, you should use your application as you normally would. You can click around the frontend of your app or you can do it through the GraphQL playground.
As requests are made to your server, Pythagora captures the queries, mutations, and responses, generating corresponding integration tests automatically. You can see the captured tests in the pythagora_tests folder in the root of your repository. Each file in this folder represents one endpoint (in the case of GraphQL, the majority of your tests will be in one file - eg. graphql.json that represents /graphql endpoint). In it, you will see an array where each item is one test and in it, you can see all the data that Pythagora has captured and that's being used to run a test.
You can continue making requests as long as you want. We were able to get to a 90% code coverage within an hour or making requests but this will obviously depend on the complexity of your app.
Running tests
Once you've captured your integration tests using Pythagora's capture mode, it's time to run them. To do so, use the following command, again replacing "my start command" with the appropriate command for your server:
npx pythagora --init-command "my start command" --mode test
By running the command, Pythagora will execute the generated integration tests, providing you with a summary of the test results, including passed tests, failed tests, and code coverage.
Ok, once you have your tests captured, you can go on with your development until you encounter a test failing. Then, you will want to debug the code.
Debugging
To debug your code, the easiest way is to put breakpoints (or console.logs) around your app and rerun the failed tests. You have 2 different commands that you can use to rerun failed tests. If you want to rerun all tests, you can type:
npx pythagora --init-command "my start command" --rerun-all-failed
This command will start running all failed tests from the previous test run one by one. If you want to debug a specific test, you can type:
npx pythagora --init-command "my start command" --mode test --test <TEST_ID>
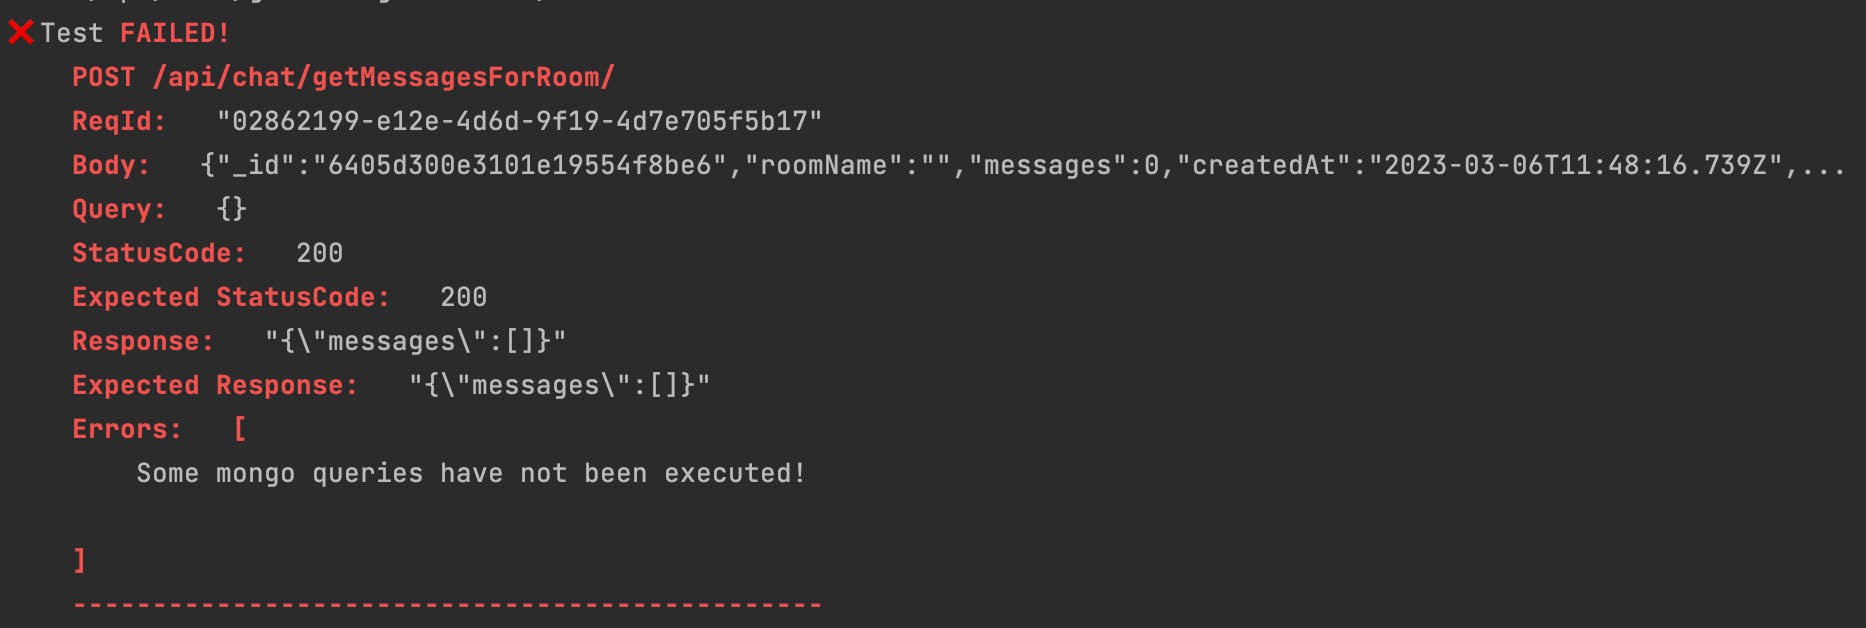
This command will run a single test that you specify by the test id. You can find the test id in the logs when a test fails. Here is an example of a failed test log in which the test id is a value inside ReqId parameter.
Code coverage
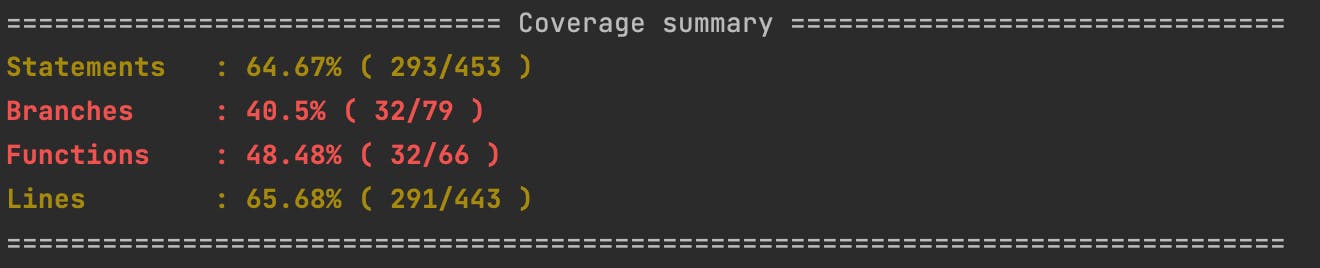
Finally, to make sure you have enough of your codebase covered with tests, Pythagora integrated nyc code coverage report. By default, you will get a summary of the code that's covered by tests each time you run the test command. It will look like this:
If you want to see all lines in your repository that are and aren't covered by tests, you can add an argument --full-code-coverage-report to the test command. For example:
npx pythagora --init-command "my start command" --mode --full-code-coverage-report
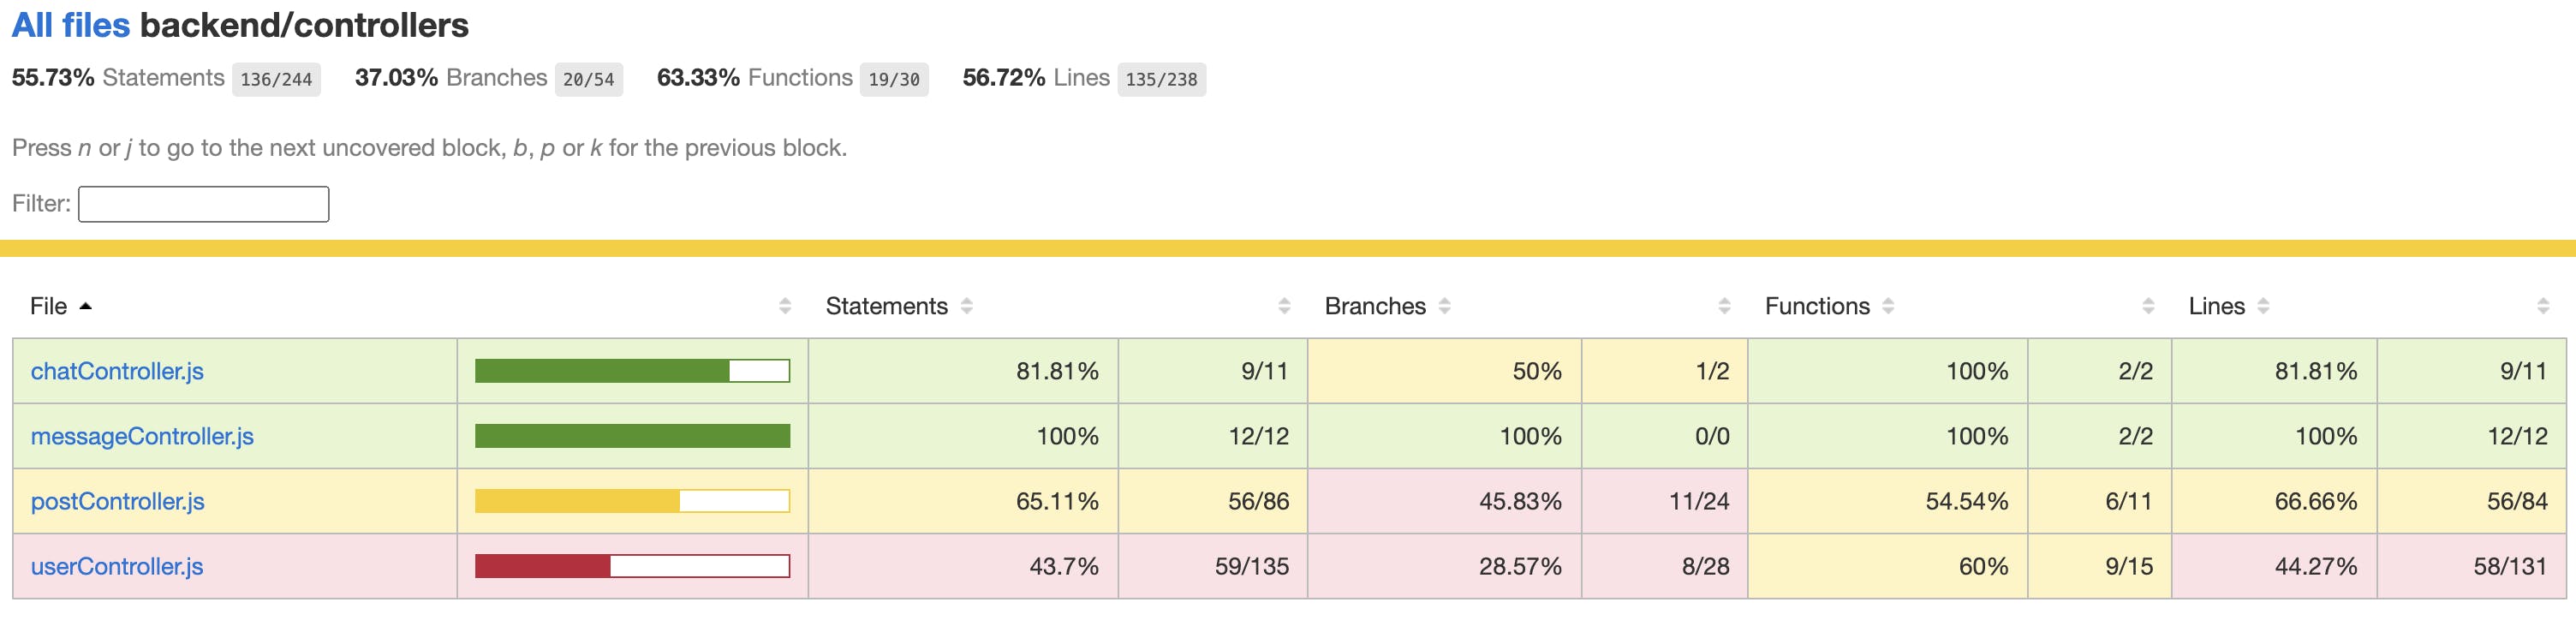
This will generate a full nyc code coverage report which you can see by opening pythagora_tests/lcov-report/index.html. This should open a static website in your browser and show you your entire repository along with files and lines that are covered with tests.
From here, you can run the Pythagora capture command again and create API requests that will trigger the uncovered lines until you get to 100% code coverage.
Conclusion
So, to summarize, in this post we went through the process of creating automated integration tests for a GraphQL server with Pythagora. This way, you can easily cover your entire backend with tests just by making API requests to your server while Pythagora is recording server activity.
Pythagora is open source so if you liked this post or Pythagora, it would mean a world to us if you star Pythagora Github repo here. To stay up-to-date on the latest features, enhancements, and news, you can add your email here. Your support will help us continue to develop and improve this powerful tool for the benefit of developers everywhere.
Thank you for reading and happy testing!